Wednesday, January 22, 2014

The P&P Bunny leech


This pattern has got to be my easiest and most effective fly for Steelhead and even Coho on occasion (in smaller size) This fly gets down fast and fishes instantly due its free moving tail. Enough talk, let's tie this thing !


Here is the materials list :-

Hook - straight eye hook large enough to accommodate the bead put on in reverse and not   cover the hook eye. I use 1/0 Mustad 34007 saltwater hooks myself, smaller for a smaller bead/fly
Thread - colour of your choice
Bead - 1/4" colour of your choice. Use a smaller bead if you want it lighter or tying it smaller
Tail - Pink two tone zonker strip (its pink by the hide but purple tipped)
Body/Tail Flash - pink polar chenille, pearl flashabou, fuschia flashabou
Body - Purple cross cut rabbit
Head - purple dubbing with a little sparkle (ice dub would be great)


Step 1 - place your bead onto your hook in reverse (large hole towards the eye) and place it in the vice. Tie in your trailer material onto your shank along the top, and also under to fully secure it and tie in the Pink polar chenille.


Step 2 - take 4-5 turns of chenille. Cut a length of two toned rabbit for the tail about 2 1/2-3" long and anchor it down well making sure it sits straight along the shank without rolling slightly to the back side.


Step 3 - Tie in purple cross cut and wrap forward to the hook eye, slightly over lap each wrap. Then tie in 2 strands of pearl flashabou doubled on each side of the fly and 4-5 strands of fuschia flashabou doubled along the top of the fly.


Final step - dub in a little bit of purple sparkle dubbing of your choice, make a few wraps to hide the ugly thread area, brush it out a little, whip finish, cut the hook bend off and your done. Here you can see how it looks unfinished before the dubbing and finished with it.


Finished fly


This colour combination has proven to be extremely effective for me and several others.


Happy Tying 
 

Tuesday, November 26, 2013

The One That Got Away

It must be one of the most cliche statements in fishing "the one that got away". But the statement goes far beyond just words. It's more of a drug. It's something that instantly plants itself when the line and rod goes dead, indicator floating slowly to the surface and we pull up expecting to see a line sans fly. It keeps us coming back for more. Anchoring in the exact same spot with an exact account on the fly, depth, water temp, wind speed, barometer, even down to what we were wearing that day. We almost always revert back to these habits in an attempt to lure it's sibling. Just recently while targeting a large feeding fish shallow. I had a chance at this fish, but it was from shore with a large tree canopy overhead, with only 5' of room between trees. I rolled out a beautiful cast and started my slow retrieve, with only a couple line wraps around my hand it came tight, without hesitation I set the hook and didn't have nearly enough room. He was lost before he felt the sting. Buck fever was quickly setting in and I was flustered to say the least. After what seemed like an eternity I saw him slurp the surface again. That was it, it was destiny and this fish wanted to feel the sting. I rolled another cast in the exact same spot. I started the same slow retrieve. When the line came tight this time i knew I couldn't set the hook with the rod, so I did a classic tarpon set. The rod started pulsing deep into the blank with every huge head shake. As I let go of the large amount of line in my hand due to the line strip set, the fish took off for his journey back to the middle depths of the lake. I lost my leverage and just as fast as I set the hook it popped out. Buck fever hit me so hard by his point I was lying on the ground laughing, "did that really happen?" Some people get mad, curse and throw their gear around. Some just laugh and find the humor in "that's fishing!" But sometimes something special happens, maybe its that horseshoe everyone says is stuck in some orifice of our body, but time slows down. All the books, magazines, videos and nagging of our fishing buddies lessons start to play a role. As the indicator does the tiddler bounce at the end of the day I decide quickly to set the hook and call it a day with this last fish on an otherwise slow day. But it's not what's expected. The rod doesn't dance around, it just bows over. The reel handle is a blur. The lake surface erupts as the inevitable cliche jumps, almost mocking me. But the rod is still bowed over and the reel is still testing it's bearings. As the line disappears below and behind the boat I hear the surface erupt again. but this time I can't see it because its directly behind me, middle boat, with both anchors buried. Without hesitation, my best fishing partner, and my loving wife jumps up and pulls anchor. Quickly I was able to swing around and gain some leverage in the violent tug of war.
This is when questions enter your mind. Did I tie a good knot? Am I putting too much pressure on the line, knot, hook, fish? Anxiety quickly sets in as I wait for the inevitable hook spitting. The fish finally shows it's side and it's about to really happen. That dream fish slips into the net and we look, laughing, but this time it's because the one that got away just became the trophy shot and more reason to use that same dam fly.

Thursday, November 21, 2013

Blue/Black tube fly

Let's tie a nice simple tube fly. If you prepare your materials before you start tying, this fly is very quick, if you don't then it will take a few minutes longer.

Here is the list of materials and pics to show some as well -

Small tubing cut to 2 1/2 - 3" in length (tube is 3/16" size)
1/4" Hot Orange cone
Thread - any colour as you wont see it
1 Black Spey Marabou feather
1 White Guinea feather
Medium chenille - purple
Diamond Braid - orange
Blue Arctic Fox
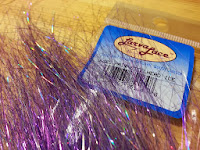
Angel Hair - Steelhead Ice
8 single strands of an Amherst feather - white/natural

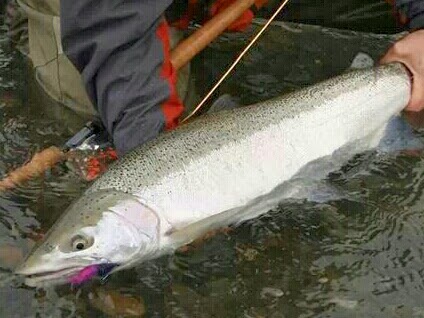
here is a few pics of reference
 
 
Now before we start tying let's prepare your Fox hair. You can see how the chunk I have cut off is fairly large looking. Its about the size of a loonie in the picture. Take your dubbing comb/brush and remove all the underfur leaving you with just the long stiff guard hairs. Just look at how small the amount your left with is.


Place your tube onto the mandrel and into your tube adapter. Run your thread onto the tube starting near the back 1/3rd of the tube. Anchor the Diamond braid and make a few wraps still working to the rear but leave 1/4" of the tube uncovered, this is where the junction tubing will cover. Wrap the braid up about 1/2" in length overlapping each wrap with the one after it to bulk it up a bit, this also helps to cover the thread colour underneath. Next pull a bit of the fluff off the string on the chenille, tie in and wrap the chenille twice the length of the braid or even a little wider. Time for the Guinea, here I have tied in the guinea at the half way point of where the chenille starts and ends. Doing it this way will result in a slightly thinner overall fly profile, if you want a fuller profile then tie in and palmer a few wraps of guinea after the chenille is placed.

Here you can see it together


next make a dubbing loop and make sure to close the loop at the tube. To make a dubbing loop you run the thread down and through the hooks of your dubbing spinner and back up and around the tube, use one wrap around the tube and then do 2 wraps around the thread and then back onto the tube. This closes the loop.
 
Place your brushed out fox hair into the loop and spread it out even and sparse
 
pinch the loop tightly with your finger tips right where the fur ends by the spinner. Spin the spinner so that the thread spins up very tight. Pull towards you and let go, zzzzing its spun ! now take a dubbing picker/brush and pick the hairs out so your left with a thin rope of long hair hackle. Palmer this forward making each turn tightly against the previous and stroke the hair back on each turn so your don't trap it.
Once you've finished wrapping the fox tie down the loop well so it cant undo itself. Next prepare a black marabou feather by peeling away all the feather and fluff from the thick end of the stem leaving you with nice thinner longer fibres and thinnest part of the feather. Pinch the tip feathers and gently brush the feather downward. Tie in the tip of the feather so the underside of the feather faces the rear of the fly, wrap it forward stroking it back with each wrap. I like to wet the feather and stroke it all back before wrapping it, this makes it a lot easier to work with but be gentle or you'll break the stem. Here I used 5 wraps -
 
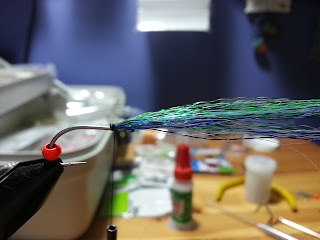
Now grab your Angel hair and work out a decent chunk (I use my dubbing picker) and cut it free. Lay this near the half way point on top of your thread and tie it down using a couple wraps, allow it to spread down the sides on the tube at the tie in point. Take the other half and pull it back but underneath instead evenly spreading it then take a couple wraps to hold it down. Use a couple more wraps to hold it and then "work" it to make it spread as evenly as you want around the entire fly.
Now you will start tying in the single strands of Amherst feather one at a time spacing them evenly around the fly. They are hard to see but they are there. Use the longer side of the feather so they extend past everything. Once your finished with that do a whip finish, add a bit of head cement and slide on your cone. With the cone on check how much tube is sticking out, you need only 1/8" to create the lip in front of the tube, cut it back it there is too much (exacto knife is best). Hold your fly upright with the bead facing your roof, take your lighter and put it near the tube allowing the tube to flare back to the bead. If the hole closes up somewhat just use your dubbing picker to bore it out. (happens a lot with the smaller tubing)
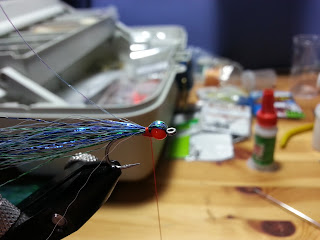
 
The fly is done !!
 
Cut a small section of junction tubing long enough to cover the tube, the knot you use to hold your hook and the hook eye and push it over the rear of the tube.
 
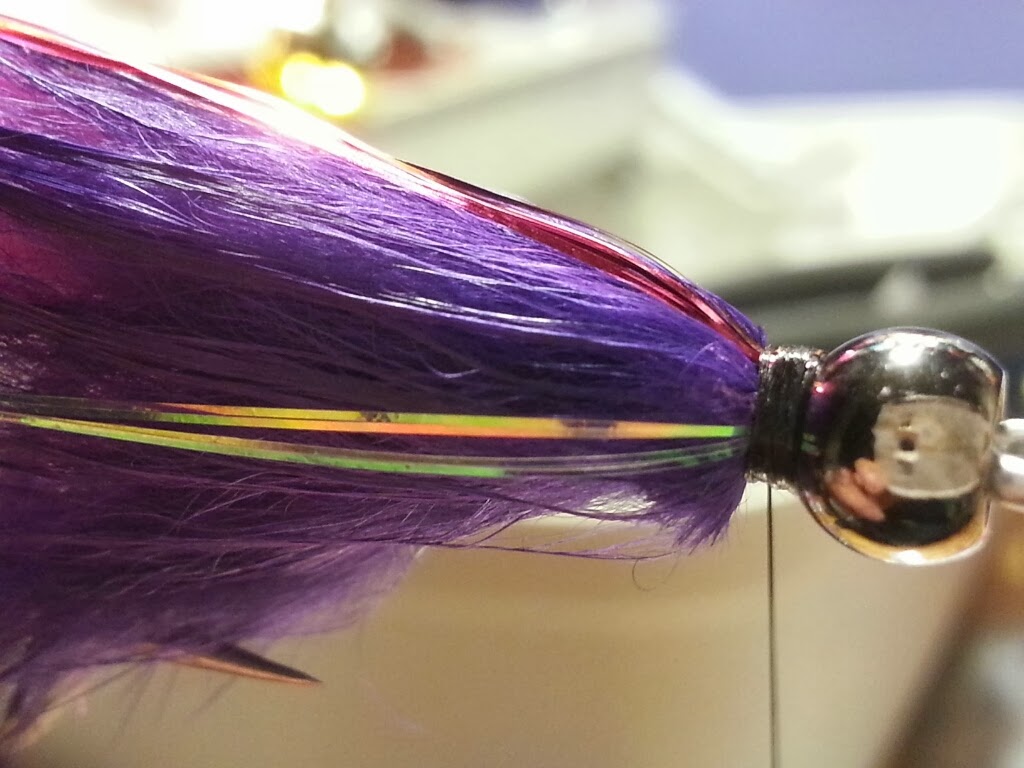
The finished fly showing its sparse profile and alluring fish eye view


Happy Tying


James


Thursday, November 7, 2013

Well we had planned to head to Wells Grey above Clearwater but when we pulled into full sites, line ups and generally a pretty busy vibe we were a bit disappointed. Maybe we were a bit naive to think it wouldn't be busy Thursday night before a long weekend, but we usually never deal with crowds of this size. It wasn't what we were wanting for over a week of relaxing and fishing. Watching the massive lightning storm we both looked at one another and knew exactly what the other was thinking, Skagit. We turned T-Rex around and headed back south. With hopes of catching some sleep  at Walmart in Kamloops before finishing our journey we were surprised to find a large sign that said "no overnight parking and rv'ing" IT was clear by the lack of RV's this may be enforced. We one eye'd it into Merritt at 1:15am and quickly got some sleep in the parking lot of Walmart. 6am and some alarm is going off, it must be to get the rv's out before opening.

 We set off and arrive at the Skagit at 9:30am to dark, wet, westcoast weather, a nice change from 35+ degree heat. I was stoked to get the 4wt switch out and start tossing some bugs with the new skagit line. It performed flawlessly and was tossing some big patterns on a 8' type 6 and 10' of T-7. I was finally happy with how the rod performed and quickly started getting some bulls working green/black bunny patterns.
Susie started nymphing big stones for the bulls and missed a couple bites but wasn't a producer like previous trips. After 4 days with only a 18" bow that apparently didn't count she asked about swinging flies and stripping them with sink tips. This is the first time in about 7 years she has asked about fishing without the bobber, err indicator. I load up a versi-tip and the 8' type 6 matched with a small tube flash pattern. The 2nd run first day swinging she gets a taker. Panic sets in quick as this is the first fish that isn't a "visual" bite. She looses the fish as fast as she realized what had happened. The next 3 days she doesn't get a bite. And we work many runs and pools hard. With every day she learns the little tips and tricks in swinging and stripping flies. Now we all know the thoughts that enters an anglers mind when someone is getting fish and you are not. Even when I was getting bows on the dry she didn't give up and pick up the 3wt. She kept working hard and really working every run.

Last day we decide to put the boat in Ross and head up the channel mouth looking for a school of bully's. Wouldn't you know it, we found one, at least 20 deep. I get Susie casting a leech first and she had a couple followers no takers. We rest it for a bit and change back to the tube pattern. Again some followers and no takers. Next cast I tell Susie to start the retrieve earlier and strip faster. Right away she gets a bite and I can see she is about the give up on the retrieve when i told her to keep stripping faster. BAM! I see a big white mouth engulf the fly and a large flash deep in the pool. The 6wt bows right over into the water. She has hooked the big boy in the school. All I hear is "oh no, oh no, what do I do". She knew exactly what to do, she just hasn't hooked a fish of this size. While the battle was next to the boat another big boy came in and tried to steel the fly from the fish's mouth. Even a smaller bull came in to see what the commotion was all about. Finally, with all her hard work, it has payed off, BIG!


I will never forget that fishing moment for the rest of my life. The fish, the smile, the relief and celebration. We fished a bit more and lost a couple more fish.I had 2 rainbows follow the fly to the boat when they quickly darted away. I left the fly sitting there a moment and a big bully came in and bumped it with his nose. Some really amazing moments to watch. We head in as the heat sets in and have a rest. Then Susie asks if we can fish the "honey hole". I never need a reason to wet a line so we head out. Wouldn't you know it, first run through I hear her laughing, she is into another bull! This one on a perfect swing.


 All in all it was a great trip of relaxing and fishing. The Skagit Valley is such an amazing place that truly offered us some of it's gems to appreciate and experience. It was the perfect place to celebrate our 11 year anniversary and have some incredible memories for life.


Monday, November 4, 2013

XMAS TREE (step by step)

                                                                   Xmas Tree

In this post I will be going over a step by step tying instruction of the Xmas Tree pattern. This fly is primarily tied for coho salmon however I have also caught pinks, chum, chinook, and cutthroat on these. This fly is an effective stripped fly however I have fished this swung and picked up many fish that way as well.

Here is a shot of 3 versions I tie. The first creations were tied with only silver beads. Since then I have done them with silver, gold, black and hot orange beads to great effectiveness. Top to bottom - blue/green, silver/pale blue, silver.


Here is a list of materials including pictures to give you a visual reference

Hook - any short shank heavy gauge will work. straight eyed hook is preferred. (Mustad C68SZ)
Bead - appropriate sized to the waters you will be fishing (5/32" pictured here, color Hot Orange)
Threads - Hot Orange for behind the bead. any colour thinner thread for under the bead.
                      If your orange is thin enough you can skip using a second thread. 
Body material - Crystal Flash, here I am using blue/green


Place the hook in the vise and run the bead to the bend of the hook. Anchor your thinner thread (black here) by the eye of the hook using only a few wraps. Now take the Crystal Flash and double it around the thread and tie it down facing towards the eye of the hook, make sure it all stays on the top of the hook. Use 2-3 wraps to tie it down and then whip finish and cut the thread off. You can add a little head cement on the thread if you want for added strength.
next push the bead up and over the crystal flash. tie in your hot orange thread behind the bead and build it up about 1/8-3/16" wide and just thick enough to hold the bead tightly in place. Now pull the crystal flash tightly over the bead, if it spreads down the sides of the bead a little its no biggie. While holding it tie it down behind the bead.
make several wraps to hold everything tightly. Here is where I will toss in a whip finish, then take a few more wraps and the final whip finish. Whenever I can on salmon/steelhead flies I like to use 2 or even 3 whip finishes with a few wraps in between, this is for strength so if it gets frayed it will only untangle to the next whip finish allowing you to keep fishing that fly.

Don't forget to add head cement on the thread and the material over top the bead, this is pretty crucial to keep the material and thread from fraying due to fish teeth.
Now here you have two options:

leave the fly long and trim it on the water (shown above) OR you can trim it at the vice. Here is a trimmed one and a pic showing how small this fly really is next to a thread spool.


I hope you have a lot of success with this pattern. You can add subtleties or change the colour completely for your local waters, be creative. I have been thinking a couple strands of red flash may even set off this pattern further.


Happy Tying


James


Sunday, November 3, 2013

Confidence, it can be as easy as that

For myself confidence is found on my home waters. It's a place where i don't need to worry about identifying the fishy areas or whats on the menu. I have spent my time here in all months of the season observing, fishing, and enjoying its many surprises.  It's almost like playing a home game in sports. It's your home field advantage. It doesn't have the sense of urgency and uncertainty that fishing a new piece of water often conjures up. It's a place where you can pull out that new fly that most would look at you puzzled, but you have seen too much to not think it may offer up a tug.

This previous weekend we set out on our final stillwater trip of the year. Wanting to end on a good note we traveled to what we consider our home lake. With cold weather and snow in the forecast we were looking forward to working leeches off the shoal. With sunny skies and frosty temperatures we set out to stalk the many shoals for hungry trout. We went to the usual spots with  some bites, but not the fast fishing action we have become accustomed to. While cycling through our leeches we decided on trying a balanced leech we had picked up from Trout Waters. These patterns are tied on a jig hook, with a bead biasing the weight forward, tied on a pin, so the fly hangs horizontally under an indicator. It only took 2 casts to bring 2 trout to the boat to know the trout had a particular interest in this new offering. We caught fish all day and had a fantastic finish to our stillwater season.

Truth be told, had i been fishing a new lake I probably would have passed by the balanced leech. Fishing a new piece of water always has me fishing my confidence patterns. The ones I have caught fish and feel confident in my choice. Fishing a pattern that you have no confidence in on a new piece of water will have you second guessing yourself instead of trying to wit a wild fish. The opposite plays true when fishing at home. Confidence in your location allows you to try new flies and work on catching fish and not re-tying every 15 minutes in self doubt. Spend some more time fishing your home waters becoming more familiar with them building your own confidence. That confidence in return will help you be successful on your next adventure to unfamiliar waters 


Chris