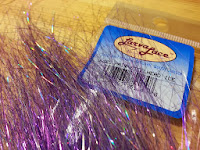
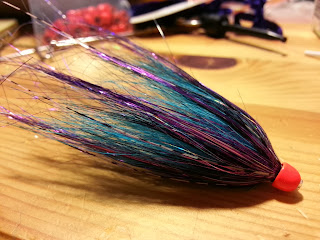
Here is the list of materials and pics to show some as well -
Small tubing cut to 2 1/2 - 3" in length (tube is 3/16" size)
1/4" Hot Orange cone
Thread - any colour as you wont see it
1 Black Spey Marabou feather
1 White Guinea feather
Medium chenille - purple
Diamond Braid - orange
Blue Arctic Fox
Angel Hair - Steelhead Ice
8 single strands of an Amherst feather - white/natural
here is a few pics of reference
Now before we start tying let's prepare your Fox hair. You can see how the chunk I have cut off is fairly large looking. Its about the size of a loonie in the picture. Take your dubbing comb/brush and remove all the underfur leaving you with just the long stiff guard hairs. Just look at how small the amount your left with is.
Place your tube onto the mandrel and into your tube adapter. Run your thread onto the tube starting near the back 1/3rd of the tube. Anchor the Diamond braid and make a few wraps still working to the rear but leave 1/4" of the tube uncovered, this is where the junction tubing will cover. Wrap the braid up about 1/2" in length overlapping each wrap with the one after it to bulk it up a bit, this also helps to cover the thread colour underneath. Next pull a bit of the fluff off the string on the chenille, tie in and wrap the chenille twice the length of the braid or even a little wider. Time for the Guinea, here I have tied in the guinea at the half way point of where the chenille starts and ends. Doing it this way will result in a slightly thinner overall fly profile, if you want a fuller profile then tie in and palmer a few wraps of guinea after the chenille is placed.
Here you can see it together
next make a dubbing loop and make sure to close the loop at the tube. To make a dubbing loop you run the thread down and through the hooks of your dubbing spinner and back up and around the tube, use one wrap around the tube and then do 2 wraps around the thread and then back onto the tube. This closes the loop.
Place your brushed out fox hair into the loop and spread it out even and sparse
pinch the loop tightly with your finger tips right where the fur ends by the spinner. Spin the spinner so that the thread spins up very tight. Pull towards you and let go, zzzzing its spun ! now take a dubbing picker/brush and pick the hairs out so your left with a thin rope of long hair hackle. Palmer this forward making each turn tightly against the previous and stroke the hair back on each turn so your don't trap it.
Once you've finished wrapping the fox tie down the loop well so it cant undo itself. Next prepare a black marabou feather by peeling away all the feather and fluff from the thick end of the stem leaving you with nice thinner longer fibres and thinnest part of the feather. Pinch the tip feathers and gently brush the feather downward. Tie in the tip of the feather so the underside of the feather faces the rear of the fly, wrap it forward stroking it back with each wrap. I like to wet the feather and stroke it all back before wrapping it, this makes it a lot easier to work with but be gentle or you'll break the stem. Here I used 5 wraps -
Now grab your Angel hair and work out a decent chunk (I use my dubbing picker) and cut it free. Lay this near the half way point on top of your thread and tie it down using a couple wraps, allow it to spread down the sides on the tube at the tie in point. Take the other half and pull it back but underneath instead evenly spreading it then take a couple wraps to hold it down. Use a couple more wraps to hold it and then "work" it to make it spread as evenly as you want around the entire fly.
Now you will start tying in the single strands of Amherst feather one at a time spacing them evenly around the fly. They are hard to see but they are there. Use the longer side of the feather so they extend past everything. Once your finished with that do a whip finish, add a bit of head cement and slide on your cone. With the cone on check how much tube is sticking out, you need only 1/8" to create the lip in front of the tube, cut it back it there is too much (exacto knife is best). Hold your fly upright with the bead facing your roof, take your lighter and put it near the tube allowing the tube to flare back to the bead. If the hole closes up somewhat just use your dubbing picker to bore it out. (happens a lot with the smaller tubing)
The fly is done !!
Cut a small section of junction tubing long enough to cover the tube, the knot you use to hold your hook and the hook eye and push it over the rear of the tube.
The finished fly showing its sparse profile and alluring fish eye view

Happy Tying
James


No comments:
Post a Comment